Dolphin Management Integration Setup
Introduction
This guide describes how to set up and use Dolphin Management’s integration with Protected Trust.
Protected Trust is a 3rd party email security system that when integrated with Dolphin Management, version 8, routes emails through a secure encrypted SMTP gateway. The recipient (patient, doctor, billing party, etc.) receives an email that provides a link to Protected Trust, where they can register for an account (if they don't already have one), enter in verification data, and view the message.
You can customize the security rules email recipients use for verifying their identity to Protected Trust. You can change these rules at any time, but the rules that go with the message stay with that message. In other words, if you send an email using one set of verification rules, then change the rules and send a new message, the new message uses the new rules, and the old message uses the rules in place when that message was sent. The recipient does not need to be aware of this because each message includes verification instructions.
Get Credential from Protected Trust
If your practice does not have an account with Protected Trust, you can sign up here
Once you have set up an account for your practice, you can acquire the required API Access Credential, user name and password using this link.
Example below:
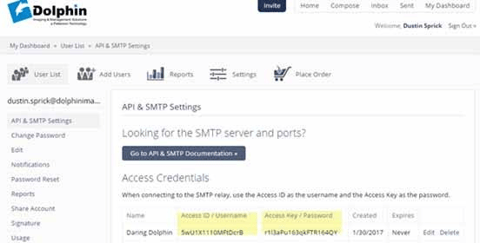
Keep the Access ID/User name and Access Key/Password handy because you need it to configure your employees’ emails from Dolphin Management.
Dolphin Management Email Setup
To set up Dolphin’s Protected Trust integration:
-
Log in to Dolphin Management and select SMS/Email Manager from the Tools menu.
-
Select Email Options from the
 pull-down menu.
 -
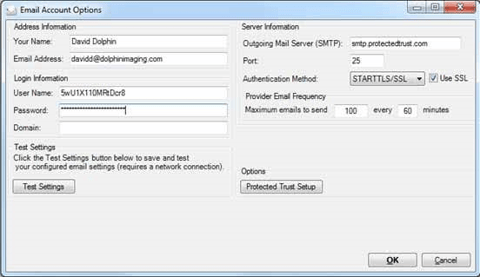
Complete the fields as follows:
-
In the Address Information group box, enter your name and email address.
-
In the Login Information group box, User Name field, enter the Protected Trust API Access ID.
-
In the Password field, enter the Protected Trust Access Key.
-
In the Server Information group box, complete the fields as follows: a
For Outgoing Mail Server (SMTP), enter smtp.protectedtrust.com.
Dolphin Management Email Setup
b For Port, enter 587. c Select STARTTLS/SSL from the Authentication Method drop-down menu. d Click the Use SSL check box.
This causes the  button to appear.
The Provider Email Frequency is set to send a maximum of 100 emails every 60 minutes, but you can change this if you want.
8. Click the button.
The first time you do this, the Protected Trust Policy message box opens. This reminds you to confirm that the following are correct on your Protected Trust account:
○ The first policy under Message Policies is set to Required Registration.
○ The following Message Security Settings option, Unregistered Recipient Identity Verification settings are checked: Customize this setting, Shared secret question & answer, Phone verification, No verification, and Require user to register. See “Get Credential from Protected Trust” on page 3-5 for more information. 9 Optional: Click the Don’t show me this again check box 10 Click OK on the Protected Trust Policy message box.
The Protected Trust Email Options dialog box opens:
9. Do one of the following:
○ Click OK to have Dolphin use the policy settings defined in Protected Trust.
There is nothing more you need to set up. Continue with “Sending Secured Email” on page 314 and “What the Recipient Sees” on page 3-14.
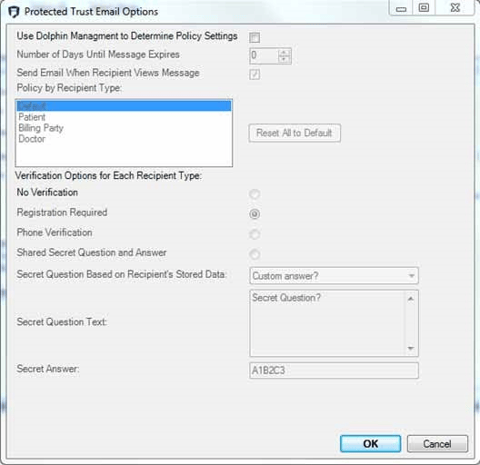
○ To customize the message policies in Dolphin, and have Dolphin’s settings override what is in your Protected Trust account, click the Use Dolphin Management to Determine Policy Settings check box.
This activates the additional fields on Protected Trust Email Options dialog box:
Setting Message Policies
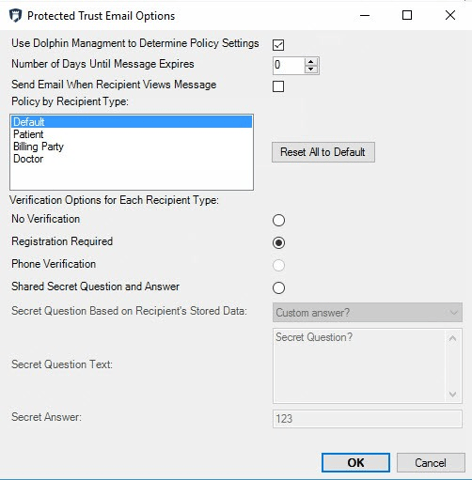
10. Optional: Enter a value for Number of Days Message Expires, or leave it at 0, which means use Protected Trust’s message expiration policy.
Note: Protected Trust’s message expiration policy is based on the user’s retention period after which the user can no longer access the message.Message retention periods vary depending upon what you purchase from Protected Trust. For more information, contact Protected Trust.
11. If you want to receive an email when the recipient views the message, click the Send Email When Recipient Views Message check box.
12. Continue with Setting Message Policies.
Setting Message Policies
Message policies describe how you want the primary email recipient to verify his or her identity before he or she can read an email sent via Protected Trust.
In Dolphin Management you can set up message policies for the following recipient types: Default, Patient,
Billing Party, and Doctor. You must have at least a Default message policy configured, which Dolphin Setting Message Policies
Management sets to require registration with Protected Trust. If you keep that setting and configure nothing else, all email recipients (patient, billing party, doctor, or unknown) will be required to sign up with Protected Trust (or log in to Protected Trust, if they already have an account) before being able to view the email.
The following sections describe how to set up customized message policies for each recipient type, including Default.
Note: Click the  button if you want to reset the default policy settings for all email recipients (Registration Required).
Default
The default recipient type refers to the message policy Protected Trust uses for all recipients other than the primary recipient. Protected Trust also uses the default message policy when it cannot determine whether the email recipient is a patient, a billing party, or a doctor, or if you have not defined any other message policy.
To set the default message policy:
-
On the Protected Trust Email Options dialog box, Policy by Recipient Type list box, select Default.
-
Under Verification Options for Each Recipient Type, select one of the following radio buttons:
| No Verification |
The email recipient can click on a link and read the secure email without having to verify his or her identity. |
| Registration Required |
The email recipient must sign up with Protected Trust to view the secure email. This is the setting Dolphin Management uses if you do not specify a different option. |
| Shared Secret Question and Answer |
The practice provides the email recipient with a question and answer that he or she can use to verify his or her identity. When you select this option, the next three options become active. |
| Secret Question Based on Recipient’s Stored Data |
The only option available is Custom answer. |
| Secret Question Text |
Enter the text you want to use when prompting the email recipient to enter the secret answer. |
| Secret Answer: |
Enter the secret answer, which must have a minimum of 4 characters. |
Setting Message Policies
Patient
This section describes how to set up the message policy to use when the primary recipient is a patient. When you send a secure email to a patient, and you carbon copy other recipients as well, those other recipients identify themselves to Protected Trust using the Default policy, described in Default above. The patient, however is prompted based on the Patient message policy.
To set a patient message policy:
1. On the Protected Trust Email Options dialog box, Policy by Recipient Type list box, select Patient.
Note: If you already completed the options for recipient type, Default, and then select Patient, the Default settings are automatically saved.
2. Under Verification options by recipient type, select one of the following radio buttons:
| No Verification |
The email recipient can click on a link and read the secure email without having to verify his or her identity. |
| Registration Required |
The email recipient must sign up with Protected Trust to view the secure email. This is the setting Dolphin Management uses if you do not specify a different option. |
| Phone Verification |
Send a verification code via voice or text to the email recipient. The recipient can then use this code to verify his or her identity and access the secure email. If you select this option, when the primary recipient receives the email, he or she clicks on the link in the email to be prompted whether Protected Trust should send a verification code via text or voice to the phone number stored in Dolphin Management. After receiving the code, the recipient enters it to open the secure email. |
| Shared Secret Question and Answer |
The practice provides the email recipient with a question and answer that he or she can use to verify his or her identity. When you select this option, the next three options become active. |
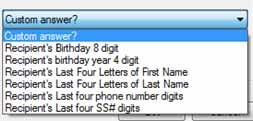
| Secret Question Based on Recipient’s Stored Data |
Select from one of the following options: |
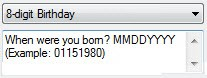
| Secret Question Text |
This field is completed for you based on the selection you make for Secret Question Based on Recipient’s Stored Data above, however you can change it. For example: |
|
| Secret Answer: |
Activated only if you select Custom answer? above, enter the secret answer, which must have a minimum of 4 characters. |
|
Setting Message Policies
The shared secret answer would be the same for all recipients of the type you are defining here.
For example, for all patient recipients, the secret answer might be: Iflosstwicedaily. Your practice can define a different custom secret answer for each policy recipient type.
Billing Party
This section describes how to set up the message policy to use when the primary recipient is a billing party.When you send a secure email to a billing party, and you carbon copy other recipients as well, those other recipients identify themselves to Protected Trust using the Default policy, described in Default above.
The billing party, however is prompted based on the Billing Party message policy.
To set a billing party message policy:
1. On the Protected Trust Email Options dialog box, Policy by Recipient Type list box, select Billing Party.
Note: If you already completed the options for recipient type, Patient, and then select Billing Party, the Patient settings are automatically saved.
2. Follow the directions for this step under “Patient” on page 3-12.
Doctor
This section describes how to set up the message policy to use when the primary recipient is a doctor. When you send a secure email to a doctor, and you carbon copy other recipients as well, those other recipients identify themselves to Protected Trust using the Default policy, described in “Default” on page 311 above. The doctor, however, is prompted based on the Doctor message policy.
To set a doctor message policy:
1. On the Protected Trust Email Options dialog box, Policy by Recipient Type list box, select Doctor.
Note: If you already completed the options for recipient type, Billing Party, and then select Doctor, the Billing Party settings are automatically saved.
Sending Secured Email
2. Follow the directions for this step under “Patient” on page 3-12.
Sending Secured Email
Once the integration with Protected Trust has been set up, you can send secure emails to everyone in your database.
For each entity in your database:
1. Open the Mail Method dialog box:
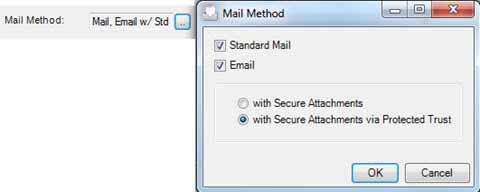
The option, with Secure Attachments via Protected Trust should already be selected providing you have set up the integration correctly.
2. Click OK.
To send secure email to a patient:
-
From the Edit a Patient, Patient tab, Email Address field, right-click on the patient’s email address, and select Send Message.
-
When the Email Settings dialog box opens, enter the text of the message and include any attachments you want to send.
-
Click OK to send the message.
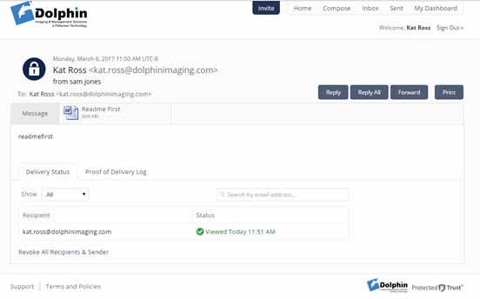
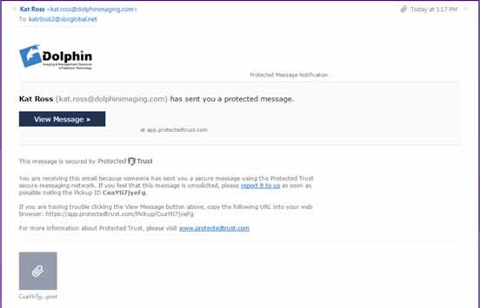
What the Recipient Sees
The screens below show an example of what the email recipient sees when opening an email from Protected Trust that requires the recipient to verify his or her identity:
What the Recipient Sees
1. If the policy requires a secret answer:
a, The email recipient clicks View Message and is prompted:
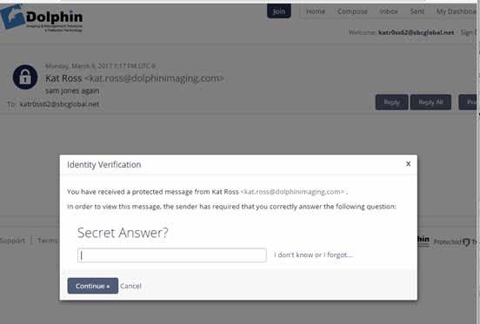
What the Recipient Sees
-
The email recipient enters the required secret answer, and clicks Continue.
The secure email opens, and if there are attachments associated with it, the recipient can download and open them.
-
If the policy requires the email recipient to sign-in to Protected Trust, and the recipient already has a Protected Trust account:
a. The email recipient clicks View Message and is prompted:

b. The email recipient logs in to his or her Protected Trust account.
The secure email opens, and if there are attachments associated with it, the email recipient can download and open them.
-
If the policy requires the email recipient to register with Protected Trust: a The email recipient clicks View Message and is prompted:
What the Recipient Sees
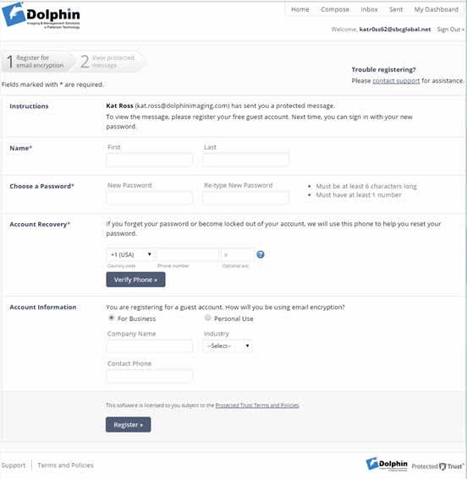
c. The email recipient completes the information and registers with Protected Trust.
The secure email opens, and if there are attachments associated with it, the email recipient can download and open them.
What the Recipient Sees