When an employee leaves your organization, you probably want to access their data (OneDrive documents and emails) and either review it, back it up, or give it to a new employee.
To preserve a former user's OneDrive files, first give yourself access to their OneDrive, and then move the files you want to keep.
-
In the admin center, go to the Users > Active users page.
-
Select a user.
-
In the right pane, select OneDrive. Under Get access to files, select Create link to files.
-
Select the link to open the file location. Download the files to your computer, or select Move to or Copy to to move or copy them to your own OneDrive or to a shared library.
Note: You can move or copy up to 500 MB of files and folders at a time.
When you move or copy documents that have version history, only the latest version is moved.
Access the Outlook data of a former user
To save the email messages, calendar, tasks, and contacts of the former employee, export the information to an Outlook Data File (.pst).
-
Add the former employee's email to your Outlook (If you reset the user's password, you can set it to something only you know.)
-
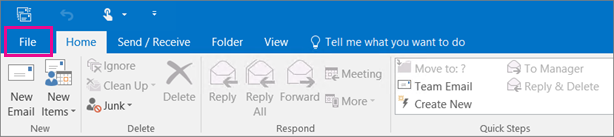
In Outlook, select File.
-
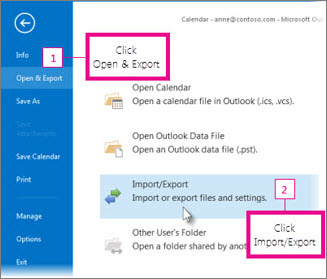
Select Open & Export > Import/Export.
-
Select Export to a file, and then select Next.

-
Select Outlook Data File (.pst), and then select Next.
-
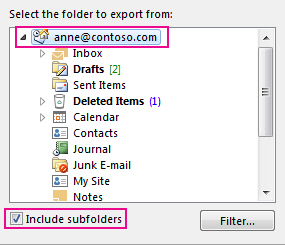
Select the account you want to export by selecting the name or email address, such as Mailbox - Anne Weiler or anne@contoso.com. If you want to export everything in your account, including mail, calendar, contacts, tasks, and notes, make sure the Include subfolders check box is selected.
-
Select Next.
-
Select Browse to select where to save the Outlook Data File (.pst). Type a file name, and then select OK to continue.
-
If you are exporting to an existing Outlook Data File (.pst), under Options, specify what to do when exporting items that already exist in the file.
-
Select Finish.
Outlook begins the export immediately unless a new Outlook Data File (.pst) is created or a password-protected file is used.
-
If you're creating an Outlook Data File (.pst), an optional password can help protect the file. When the Create Outlook Data File dialog box appears, type the password in the Password and Verify Password boxes, and then select OK. In the Outlook Data File Password dialog box, type the password, and then select OK.
-
If you're exporting to an existing Outlook Data File (.pst) that is password protected, in the Outlook Data File Password dialog box, type the password, and then select OK.
Give another user access to a former user's email
To give access to the email messages, calendar, tasks, and contacts of the former employee to another employee, import the information to another employee's Outlook inbox.
-
In Outlook, go to File > Open & Export > Import/Export.
This starts the Import and Export Wizard.
-
Select Import from another program or file, and then select Next.

-
Select Outlook Data File (.pst), and select Next.
-
Browse to the .pst file you want to import.
-
Under Options, choose how you want to deal with duplicates
-
Select Next.
-
If a password was assigned to the Outlook Data File (.pst), enter the password, and then select OK.
-
Set the options for importing items. The default settings usually don't need to be changed.
-
Select Finish.