You can use the Exchange admin center (EAC) to assign permissions to a mailbox or group so that other users can access the mailbox or send email messages that appear to come from the mailbox or group. Users given permissions are called delegates.
The permissions that you can assign to delegates for mailboxes and groups in Exchange Server are described below:
Note: Although you can use the Exchange Management Shell to assign some or all of these permissions to other delegate types on other kinds of recipient objects, this topic focuses on the delegate and recipient object types that produce useful results.
Full Access:
- Allows the delegate to open the mailbox, and view, add and remove the contents of the mailbox. Doesn't allow the delegate to send messages from the mailbox.
- If you assign the Full Access permission to a mailbox that's hidden from address lists, the delegate won't be able to open the mailbox.
- By default, arbitration and discovery mailboxes are hidden from address lists. By default, the mailbox auto-mapping feature uses Autodiscover to automatically open the mailbox in the delegate's Outlook profile (in addition to their own mailbox).
Send As:
- Allows the delegate to send messages as if they came directly from the mailbox or group. There's no indication that the message was sent by the delegate.
- Doesn't allow the delegate to read the contents of the mailbox.
- If you assign the Send As permission to a mailbox that's hidden from address lists, the delegate won't be able to send messages from the mailbox.
Note: If a user has both Send As and Send on Behalf permissions to a mailbox or group, the Send As permission is always used.
Use the Exchange Admin Center (EAC) to assign permissions to individual mailboxes
-
In the Exchange Admin Center, click Recipients in the feature pane. Depending on the type of mailbox that you want to assign permissions for, click on one of the following tabs:
-
Mailboxes: User or linked mailboxes.
-
Resources: Room or equipment mailboxes.
-
Shared: Shared mailboxes.
-
-
In the list of mailboxes, select the mailbox that you want to assign permissions for, and then click Edit
 .
. -
On the mailbox properties page that opens, click Mailbox delegation and configure one or more of the following permissions:
-
Send As: Messages sent by a delegate appear to come from the mailbox.
-
Send on Behalf: Messages sent by a delegate have " <Delegate> on behalf of <Mailbox>" in the From address. Note that this permission isn't available in the EAC for shared mailboxes.
-
Full Access: The delegate can open the mailbox and do anything except send messages.
To assign permissions to delegates, click Add
 under the appropriate permission. A dialog box appears that lists the users or groups that can have the permission assigned to them. Select the user or group from the list, and then click Add. Repeat this process as many times as necessary. You can also search for users or groups in the search box by typing all or part of the name, and then clicking Search
  . When you're finished selecting delegates, click OK.
To remove a permission from a delegate, select the delegate in the list under the appropriate permission, and then click Remove
 .
. -
-
When you're finished, click Save.
Use the EAC to assign permissions to multiple mailboxes at the same time
-
In the EAC, navigate to Recipients > Mailboxes.
-
Select the mailboxes that you want to assign permissions for. Use click + Shift key + click to select a range of mailboxes, or Ctrl key + click to select multiple individual mailboxes. The title of the details pane changes to Bulk Edit as shown in the following diagram.
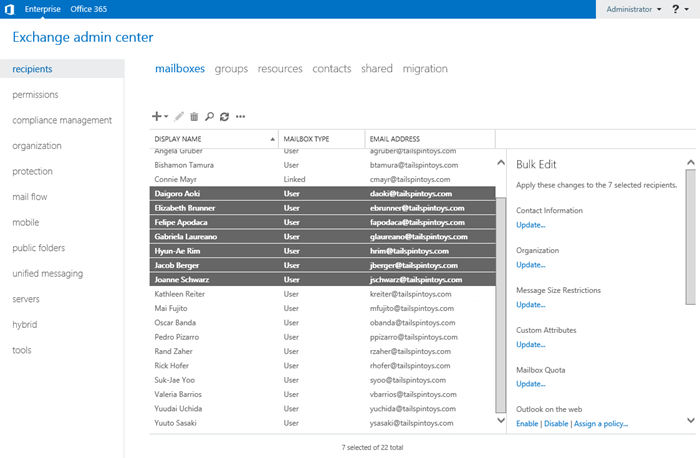
Note that the mailboxes that you select need to be the same type. For example, if you select both user mailboxes and linked mailboxes, you'll get a warning in the details pane that says bulk edit won't work.
-
At the bottom of the details pane, click More options. Under the Mailbox Delegation option that appears, choose Add or Remove. Depending on your selection, do one of the following steps:
-
Add: In the Bulk Add Delegation dialog box that appears, click Add
under the appropriate permission (Send As, Send on Behalf, or Full Access). When you're finished selecting users or groups to add as delegates, click Save. -
Remove: In the Bulk Remove Delegation dialog box that appears, click Add
under the appropriate permission (Send As, Send on Behalf, or Full Access). When you're finished selecting users or groups to remove from the existing delegates, click Save.
-
Use the EAC to assign permissions to groups
-
In the EAC, navigate to Recipients > Groups.
-
In the list of groups, select the group that you want to assign permissions for, and then click Edit
. -
On the group properties page that opens, click Group delegation and configure one of the following permissions:
-
Send As: Messages sent by a delegate appear to come from the group.
-
Send on Behalf: Messages sent by a delegate have " <Delegate> on behalf of <Group>" in the From address.
-
-
To assign permissions to delegates, click Add
under the appropriate permission. A dialog box appears that lists the users or groups that can have the permission assigned to them. Select the user or group from the list, and then click Add. Repeat this process as many times as necessary. You can also search for users or groups in the search box by typing all or part of the name, and then clicking Search . When you're finished selecting delegates, click OK.To remove a permission from a delegate, select the delegate in the list under the appropriate permission, and then click Remove
. -
When you're finished, click Save.
Source: https://docs.microsoft.com/en-us/exchange/recipients/mailbox-permissions?view=exchserver-2019