This article explains how you can send email from devices and business applications when all of your mailboxes are in Office 365, such as a scanner, and you want to email scanned documents to yourself or someone else.
Authenticate your device or application directly with an Office 365 mailbox, and send mail using SMTP client submission:
More than one method is available to set up SMTP with Office 365, this option supports most usage scenarios and it's the easiest to set up. Choose this option when:
-
You want to send email from a third-party hosted application, service, or device(such as a Printer/Scanner)
-
You want to send email to people inside and outside your organization.
To configure your device or application, connect directly to Office 365 using the SMTP client submission endpoint smtp.office365.com.
Each device/application must be able to authenticate with Office 365. The email address of the account that's used to authenticate with Office 365 will appear as the sender of messages from the device/application.
Enter the following settings directly on your device or in the application as their guide instructs (it might use different terminology than this article). As long as your scenario meets the requirements for SMTP client submission, the following settings will enable you to send email from your device or application.
| Device or Application setting | Value |
|---|---|
| Server/smart host | smtp.office365.com |
| Port | Port 587 (recommended) or port 25 |
| TLS/StartTLS | Enabled |
| Username/email address and password | Enter the sign in credentials of the hosted mailbox being used |
Option 2 Configure a connector to send mail using Office 365 SMTP relay:
This option is more difficult to implement than the others. Only choose this option when:
- SMTP client submission (Option 1) is not compatible with your business needs or with your device
SMTP relay lets Office 365 relay emails on your behalf by using a connector that's configured with your public IP address or TLS a certificate. Setting up a connector makes this a more complicated option.
Settings for Office 365 SMTP relay:
| Device or application setting | Value |
|---|---|
| Server/smart host | Your MX endpoint, e.g. yourdomain-com.mail.protection.outlook.com |
| Port | Port 25 |
| TLS/StartTLS | Enabled |
| Email address | Any email address in one of your Office 365 verified domains. This email address does not need a mailbox. |
If you already have a connector that's configured to deliver messages from your on-premises organization to Office 365 (for example, a hybrid environment), you probably don't need to create a dedicated connector for Office 365 SMTP relay. If you need to create a connector, use the following settings to support this scenario:
| Connector setting | Value |
|---|---|
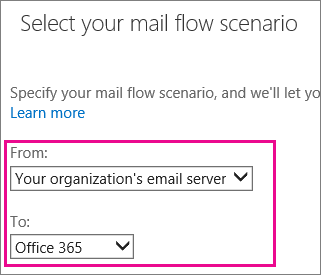
| From | Your organization's email server |
| To | Office 365 |
| Domain restrictions: IP address/range | Your on-premises IP address or address range that the device or application will use to connect to Office 365 |
We recommend adding an SPF record to avoid having messages flagged as spam. If you are sending from a static IP address, add it to your SPF record in your domain registrar's DNS settings as follows:
| DNS entry | Value |
|---|---|
| SPF | v=spf1 ip4:<Static IP Address> include:spf.protection.outlook.com -all |
Step-by-step configuration instructions for SMTP relay:
-
Obtain the public (static) IP address that the device or application with send from. A dynamic IP address isn't supported or allowed. You can share your static IP address with other devices and users, but don't share the IP address with anyone outside of your company. Make a note of this IP address for later.
-
Select Domains. Make sure your domain, such as contoso.com, is selected. Click Manage DNS and find the MX record. The MX record will have a POINTS TO ADDRESS value that looks similar to cohowineinc-com.mail.protection.outlook.com as depicted in the following screenshot. Make a note of the MX record POINTS TO ADDRESS value. You'll need this later.

-
Check that the domains that the application or device will send to have been verified. If the domain is not verified, emails could be lost, and you won't be able to track them with the Exchange Online message trace tool.
-
In Office 365, click Admin, and then click Exchange to go to the Exchange admin center.
-
In the Exchange admin center, go to Mail flow > Connectors.
-
Check the list of connectors set up for your organization. If there is no connector listed from your organization's email server to Office 365, create one:
-
To start the wizard, click the plus symbol +. On the first screen, choose the options that are depicted in the following screenshot:
-
Click Next, and give the connector a name.
-
On the next screen, choose the option By verifying that the IP address of the sending server matches one of these IP addresses that belong to your organization, and add the IP address from step 1.
-
Leave all the other fields with their default values, and select Save.
-
-
Now that you are done with configuring your Office 365 settings, go to your domain registrar's website to update your DNS records. Edit your SPF record. Include the IP address that you noted in step 1. The finished string should look similar to this v=spf1 ip4:10.5.3.2 include:spf.protection.outlook.com ~all, where 10.5.3.2 is your public IP address. Skipping this step can cause email to be sent to recipients' junk mail folders.
-
Now, go back to the device, and in the settings, find the entry for Server or Smart Host, and enter the MX record POINTS TO ADDRESS value that you recorded in step 3.
-
To test the configuration, send a test email from your device or application, and confirm that it was received by the recipient.